
Introduction: Why Starlink Connection Drops Need a Systematic Diagnosis
If you need to fix starlink connection drops, the first thing to understand is that intermittent satellite internet problems rarely have one universal cause. A Starlink terminal can lose connectivity because its antenna temporarily loses visibility of a satellite, a cable connection becomes unreliable, the router experiences a local network problem, or the service itself encounters an interruption. These failures can look remarkably similar from a laptop or smartphone, even though the underlying problems require completely different solutions. For American households outside reliable cable and fiber coverage, that distinction matters. A remote worker in rural Montana might experience a dropped video conference while a family member streams television, whereas an RV traveler crossing the Southwest may see connectivity disappear whenever the vehicle changes position or nearby terrain blocks the antenna’s view. Neither situation automatically means the dish is defective. The useful starting point is to identify whether the interruption originates between the terminal and satellite network, inside the physical hardware, or somewhere between the router and the device being used. Starlink’s mobile application provides status information, obstruction visualization, outage history, and troubleshooting options that help narrow the possibilities. Instead of repeatedly restarting equipment and hoping for improvement, record the exact status, check the physical connections, and compare the timing of the interruption with weather conditions and local network activity. That sequence prevents unnecessary purchases and gives support technicians meaningful diagnostic information if the problem persists.
A connection drop becomes particularly frustrating when the household depends on Starlink for work meetings, cloud applications, VoIP calls, security cameras, or live streaming. A brief interruption may recover before a speed test finishes, yet still interrupt a VPN tunnel or force a video conference to reconnect. This is why a speed test alone is not a reliable diagnostic tool. A connection can deliver excellent download throughput between interruptions while still suffering packet loss, brief outages, or unstable latency. The distinction between internet availability and local Wi-Fi reliability is equally important. If a phone disconnects while another device continues browsing, the dish may be operating normally and the fault may involve wireless interference, roaming, or a particular device. If every connected device loses internet simultaneously and the Starlink application reports an antenna or cable warning, the investigation should move toward the terminal, power supply, and service connection. Begin with observations rather than assumptions. Note whether the outage occurs during rain, at a particular time, after moving an RV, or whenever a specific appliance starts. Those patterns can reveal obstruction, power, or network-related problems much faster than an indiscriminate factory reset. The objective of this guide is to establish a repeatable troubleshooting process that distinguishes temporary environmental interruptions from persistent hardware faults and identifies when professional installation assistance or Starlink support is appropriate.
Featured Snippet: Quick Diagnosis
To fix intermittent Starlink drops, check service alerts and antenna status in the app, inspect obstruction history, and verify every cable connection. Power-cycle the system safely, test directly through the Starlink router, and compare cable diagnostics with outage timestamps. Persistent hardware warnings warrant a support ticket.
Deep-Dive Root Cause Analysis: What Actually Interrupts Starlink?
1. RF Obstructions and Micro-Blockages
Starlink uses electronically steered phased-array antennas to communicate with satellites moving across the sky. Its terminals operate across licensed satellite frequency bands, including Ku-band and, depending on the network link and equipment, Ka-band. These high-frequency radio links require a sufficiently clear propagation path. Trees, rooflines, chimneys, utility structures, and nearby buildings can obstruct portions of the antenna’s field of view. A tree does not need to cover the entire dish to create a service problem. Branches moving in wind can repeatedly intersect the same portion of the sky, producing short interruptions that are particularly noticeable during interactive applications. A chimney edge or roof ridge may similarly block a narrow region of the terminal’s usable sky view. The Starlink app’s obstruction visualization helps identify these areas, while outage history can reveal whether interruptions are recurring at particular intervals. The important distinction is that an obstruction is a physical visibility problem, not simply weak household Wi-Fi. Moving the router, changing a wireless channel, or replacing a cable will not clear a blocked satellite path. Installation height and placement can help, but raising a dish introduces structural and weather-exposure considerations. Homeowners should have roof-mounted equipment inspected or repositioned by a qualified installer rather than climbing onto a roof during troubleshooting. For RV users, the terminal must have an appropriate sky view at the current parking location and must be configured for the intended stationary or mobile use.
2. Proprietary Cable Degradation and Connector Problems
The cable connecting a Starlink terminal to its associated router or power equipment carries data and, on applicable systems, electrical power. Its connector design varies by hardware generation, so a Gen 2 installation should not automatically be treated like a Gen 3 installation. Some Gen 2 configurations use proprietary connectors and a separate power supply or router arrangement, while Gen 3 Standard equipment uses a different cable and connection architecture. A connector that is incompletely seated, physically damaged, contaminated, or exposed to repeated mechanical stress can produce intermittent communication. Cable faults may appear after an installation has been moved, after a connector has been pulled sideways, or following prolonged vibration. Wind-driven movement can gradually stress a cable where it enters a connector, especially if the cable is unsupported or sharply bent. Moisture intrusion is another concern when a cable or connector seal has been damaged, although a weather-resistant connector should not be assumed defective merely because it is outdoors. Inspect visible cable sections for cuts, crushing, severe kinks, and damaged jackets. Do not scrape contacts, bend pins, apply household lubricants, or force a connector into place. Dielectric grease is not a universal remedy and should not be applied to proprietary contacts unless Starlink’s instructions for that specific connector explicitly permit it. If a cable fault is suspected, reseat it only according to the equipment instructions and with power disconnected. Persistent cable warnings, visible damage, or recurring cable-related diagnostic errors justify a support request and possible replacement with the correct Starlink-compatible cable.
3. Thermal Limiting, Snow-Melt Demand, and Power Quality
Outdoor electronics experience different operating conditions in Arizona summer heat, northern winter weather, and exposed RV installations. Starlink’s published specifications vary by hardware model, so there is no single temperature threshold that applies to every dish, router, and power supply. For example, Starlink’s current Standard specifications list an operating range of approximately -30°C to 50°C (-22°F to 122°F) for that terminal model. Operation near environmental limits, direct solar exposure, restricted ventilation around indoor equipment, or an unusually hot enclosure can affect reliability. Snow-melt functionality also changes power demand. Starlink provides Off, Automatic, and Pre-heat settings on supported equipment; Pre-heat can increase power consumption, while Automatic is designed to heat when needed. Heavy snow accumulation can still interrupt service if snowfall exceeds the terminal’s ability to clear it. Power quality deserves separate attention. A loose household receptacle, overloaded extension cord, failing UPS, or unstable inverter may interrupt the power supply even when the dish itself is healthy. Rural electrical systems can experience outages and voltage disturbances, but a user should not assume that every disconnect is caused by the utility grid. Test only with a properly rated, known-good outlet and manufacturer-approved power equipment. Do not open the power supply or attempt internal electrical repairs. If interruptions correlate with power events, have a qualified electrician evaluate the circuit.
4. Router Congestion, Mesh Conflicts, and DNS Delays
Not every Starlink interruption is a satellite interruption. A home network may experience Wi-Fi interference, excessive client roaming, overloaded mesh nodes, poor router placement, or problems introduced by a third-party router. The 2.4 GHz band generally reaches farther through walls but has fewer non-overlapping channels and is often crowded by neighboring networks and household devices. The 5 GHz band can provide greater capacity over shorter distances, although walls and distance reduce its signal more quickly. A device that repeatedly moves between access points may appear to lose internet even when the Starlink terminal remains online. Bufferbloat is another possible source of poor interactive performance: when a connection is saturated by uploads or downloads, queues can increase latency and make calls or games feel disconnected. DNS lookup delays can prevent a new website or application session from resolving promptly, but changing DNS does not repair a physical satellite link or packet loss occurring upstream. Third-party mesh systems also need a correctly designed topology. Running multiple routers in separate NAT layers can complicate device discovery, port forwarding, and troubleshooting. Starlink’s supported bypass configuration depends on the router generation and hardware arrangement. Before changing advanced settings, test one device directly on the Starlink Wi-Fi network, pause large transfers, and compare the result with the third-party network. If the Starlink connection remains stable while the mesh network fails, focus on the local network rather than replacing the dish.
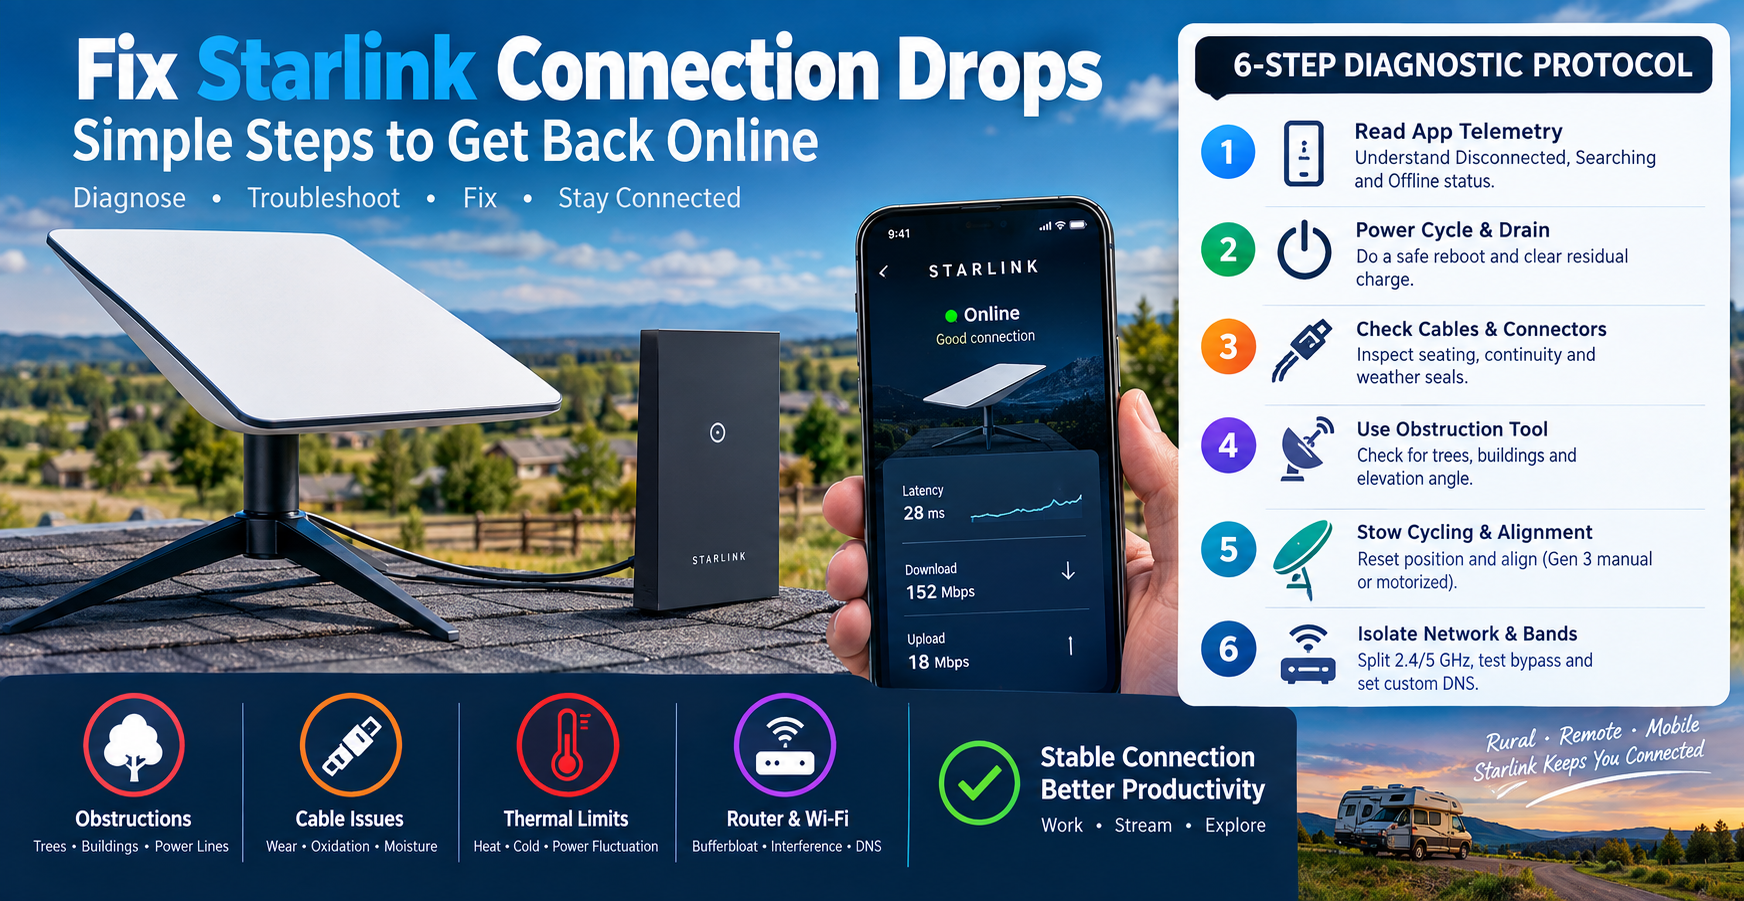
The 6-Step Comprehensive Diagnostic Protocol
Work through these steps in order to isolate the failure before replacing hardware or changing network settings. Perform cable inspections from accessible locations, disconnect power before handling connectors, and use a qualified installer for roof-mounted equipment. Never open the power supply, defeat a weather seal, or attempt to repair proprietary connector contacts. Record each interruption’s time, app status, and whether other devices are affected.
Step 1: Read App Telemetry — Disconnected vs. Searching vs. Offline
The Starlink app’s status labels describe different conditions, and understanding them is central to an effective starlink offline fix. Searching generally indicates that the terminal is attempting to establish or re-establish communication with the satellite network. This can occur during initial setup, after movement, during recovery from an interruption, or while the terminal is completing an update. A short searching period is not automatically a hardware failure. If the status persists, examine obstruction information, service alerts, and whether the dish has a clear view of the sky. A Disconnected indication needs context: the app may be reporting a communication problem between the phone and router, a terminal connection issue, or a broader loss of service. The exact wording and available diagnostics can vary by app release and hardware. Offline is a broad user-facing description rather than a guaranteed diagnosis of a particular failed component. It may accompany a power problem, cable fault, terminal startup, service interruption, or router connectivity issue. Do not treat these labels as interchangeable protocol error codes or assume they reveal a specific satellite handshake failure. Instead, open the app while connected to the Starlink network if possible, inspect alerts and outage history, and note whether the router remains reachable. If the phone is connected to Wi-Fi but the app cannot communicate with the terminal, investigate the local router path before concluding that the satellite link is down. If all devices lose internet and the terminal reports a hardware warning, move to the physical checks.
Step 2: Perform a Safe Cold Reboot
A controlled power cycle can clear a temporary software or network state, but repeatedly switching power on and off is not a substitute for diagnosis. First, save any work and notify household members that the connection will briefly stop. Use the Starlink app’s restart option if it is available for your hardware. Otherwise, disconnect the system from its normal power source using the manufacturer-approved method. Leave it unpowered for approximately 30 seconds before restoring power. This allows the equipment to shut down and restart cleanly; there is no need to open the router or power supply, short contacts, or manually discharge internal capacitors. Do not rapidly toggle a wall switch or repeatedly unplug and reconnect the cable while the equipment is booting. Once power is restored, allow the terminal to initialize and reconnect. Startup and network acquisition times vary with model, software, and conditions, so avoid declaring failure after only a minute or two. If the terminal returns online, observe whether the original interruption pattern recurs. If it remains offline, record the status and proceed to cable inspection rather than performing repeated resets. A factory reset is a separate action and may erase configuration; do not use it as the default response to intermittent drops.
Step 3: Inspect Cable Seating, Connector Condition, and Drip Loops
Cable inspection should begin with the accessible indoor equipment and continue along any visible exterior cable route. Disconnect power before reseating a connector, then follow the instructions for the exact Starlink model. Check that connectors are fully inserted and that their locking or retention features are intact. Examine accessible cable sections for cuts, flattened areas, sharp bends, abrasion, or damage caused by doors, windows, mounts, or vehicle movement. Look for signs of moisture intrusion or corrosion without probing contacts or applying cleaning chemicals. A cable may fail internally even when its outer jacket looks normal, so visual inspection alone cannot prove continuity. If the cable passes through an exterior wall, verify that the entry point is properly protected and that water cannot travel along the cable into the building. A drip loop is a downward curve in the cable before it enters a wall or enclosure; it encourages rainwater to fall away rather than follow the cable indoors. Support the cable so wind does not repeatedly flex the connector, while respecting the manufacturer’s bend-radius and mounting guidance. Do not use excessive zip-tie tension, staple through the cable, or apply unapproved grease to connector pins. If a cable warning remains after correct reseating, or the cable is visibly damaged, document the model and cable part number and contact Starlink about replacement with the correct cable.
Step 4: Use the Obstruction Tool and Review Elevation Visibility
Open the Starlink app’s obstruction feature and follow the on-screen instructions to scan the antenna’s sky view. The resulting visualization helps identify portions of the field of view blocked by trees, buildings, rooflines, or other objects. Red or otherwise highlighted areas indicate obstruction regions in the app’s visualization; consult the legend in your current app version rather than assuming every color has identical meaning across releases. Compare the obstruction view with outage history and the times when calls or streams failed. A recurring interruption pattern can be consistent with a fixed obstruction, but timing alone does not prove the cause. If the visualization identifies a tree canopy or roof edge, consider a different mounting location or a professionally evaluated mount height. Trimming foliage may help where legally permitted and safe, but do not cut branches near power lines or climb onto a roof to perform a quick test. For an RV, move to a clear, stable parking location and repeat the obstruction scan. If the obstruction map is clear but the terminal continues to drop, proceed to power, cable, and network isolation.
Step 5: Stow Cycling, Repositioning, and Gen 3 Alignment
Dish movement and alignment procedures depend on the model. Motorized Starlink terminals may provide a stow function in the app, while non-actuated Standard terminals require manual orientation according to their installation instructions. Stowing and unstowing is not a universal repair for intermittent service, nor should it be described as a guaranteed way to force an ephemeris download. The terminal manages satellite acquisition and network updates through its own software. If the app reports a motor or positioning alert, follow the model-specific support instructions and check for visible obstructions around the mechanism from a safe location. Ice or snow around the base can occasionally prevent an actuated terminal from repositioning; clear buildup only when accessible and safe. For Gen 3 Standard equipment, use the app’s software-assisted alignment guidance and the manufacturer’s orientation instructions. Do not guess an azimuth angle from a generic online diagram, because the required orientation depends on installation location and model. If the dish was recently moved, allow it time to acquire service and complete any required initialization. Avoid repeatedly rotating or repositioning a working terminal in response to every brief outage.
Step 6: Isolate Wi-Fi, Test Bands, and Configure Third-Party Equipment
Begin by connecting a device near the Starlink router and checking whether the internet remains stable while the device is stationary. If possible, compare multiple devices and note whether only one client disconnects. If the router supports separate network names for 2.4 GHz and 5 GHz, temporarily separate the bands using the router’s available settings. This can help identify band-steering or roaming issues, although the option is not available in every Starlink router generation or firmware version. Test the device on each band and compare stability rather than assuming that 5 GHz is always better. For third-party mesh equipment, simplify the topology: test with the Starlink router alone, then reintroduce the mesh system. If your model supports bypass mode, consult its current instructions before enabling it; bypass behavior and reset requirements differ across generations. Avoid creating multiple competing DHCP servers or unintended double-NAT arrangements. Custom DNS such as Cloudflare’s 1.1.1.1 or Google’s 8.8.8.8 can be tested when the symptom involves name-resolution delays, but DNS changes will not correct satellite outages, cable faults, or Wi-Fi interference. Pause large uploads and cloud backups while testing interactive applications. If latency rises sharply only during heavy uploads, investigate queue management or router quality. If the Starlink app reports a terminal outage at the same moment, local Wi-Fi tuning is unlikely to resolve the root cause.
Master Troubleshooting Reference Table
| Hardware/App Indicator | Root Failure Point | Severity Level | Diagnostic Test | Permanent Fix |
| Searching for extended period | Obstruction, acquisition, startup, or service issue | Moderate | Check alerts, obstruction view, and outage history | Clear sky view; allow initialization; contact support if persistent |
| Disconnected status | Router-to-terminal communication or local connectivity | Moderate–High | Compare app status with other devices and router reachability | Reseat correct connections; isolate router and terminal |
| Offline across all devices | Power, terminal, cable, or service interruption | High | Check power, alerts, cable condition, and service status | Correct power or cable fault; support escalation |
| Frequent brief outages | Obstruction or intermittent physical/network fault | Moderate | Correlate outage timestamps with obstruction and cable diagnostics | Improve placement or replace confirmed faulty hardware |
| Cable warning | Cable, connector, or port issue | High | Inspect cable and reseat per model instructions | Correct compatible cable replacement |
| Poor Wi-Fi in one room | Coverage or interference | Low–Moderate | Test near router and compare bands | Reposition router or improve mesh placement |
| High latency during uploads | Bufferbloat or saturated uplink | Moderate | Pause uploads and repeat latency test | Configure suitable queue management or router |
| Snow-related interruption | Snow accumulation or blocked movement | Moderate | Check dish surface and app alerts | Use supported snow-melt settings; safe installation location |
| Drops during heavy rain | Weather-related link degradation | Moderate | Compare outage timing with weather | Wait for conditions to improve; inspect installation |
| Router repeatedly restarts | Power or router fault | High | Test approved outlet and inspect power cable | Correct power issue or seek replacement assessment |
| One device disconnects | Client Wi-Fi, roaming, or device configuration | Low–Moderate | Test another device and stationary connection | Update client settings or address coverage |
| All devices fail after mesh change | Network topology or bypass configuration | Moderate | Test Starlink router without mesh | Correct topology and router configuration |
Debug Data Analysis and Submitting a Useful Starlink Support Ticket
The Starlink app provides diagnostic information that can help distinguish a service interruption from a physical or local-network fault. The exact menu arrangement can change between app versions, so use the current Settings or Advanced area and look for Debug Data or the equivalent diagnostic screen. In some versions, the option appears near the bottom of the app’s settings or advanced information. If it is not visible, confirm that the app is updated and that the phone is connected to the Starlink network. Do not assume that a missing menu means the hardware has failed. The debug view may contain technical fields such as terminal and router information, software versions, connectivity statistics, and cable-related measurements. Record the values and timestamps associated with the interruption rather than treating one isolated reading as definitive. Ping drop rate describes unanswered probes to a network endpoint; it is not identical to Wi-Fi signal strength. Signal quality or SNR-related information reflects radio-link conditions where exposed by the interface, but the precise presentation varies. Cable ping statistics, when available, can help identify communication problems along the terminal-to-router path. A repeated cable warning combined with visible cable damage is more compelling evidence than a single transient value.
When opening a support ticket, provide a concise fault description with enough evidence for the support team to understand what has already been tested. Include the terminal model, router model, approximate installation date, the date and local time of the first observed interruption, whether the issue is continuous or intermittent, and whether all devices are affected. Attach screenshots of the relevant app status, obstruction view, outage history, and diagnostic information where available. Describe the troubleshooting performed: for example, whether you safely power-cycled the system, checked accessible cable connections, tested a different approved outlet, and isolated third-party networking equipment. If a replacement cable is being considered, state the exact hardware generation and cable type rather than requesting a generic replacement. Avoid claiming that a particular component is defective unless the evidence supports it. A clear ticket does not guarantee automated hardware replacement; replacement decisions depend on Starlink’s assessment, warranty terms, diagnostic evidence, and availability. Keep the ticket factual, retain the case number, and respond promptly if support requests additional tests or photographs.
Example Support Ticket
My Starlink connection has experienced intermittent outages since [date/time, local time zone]. The app reports [exact status], and the interruptions affect [all devices / specific devices]. I checked the obstruction view and reviewed outage history. I safely power-cycled the system and inspected accessible cable connections. The issue continues. Attached are screenshots of the status, outage history, and available debug data. Hardware model: [model]. Router model: [model]. Please review the diagnostics and advise whether additional testing or a replacement component is appropriate.
Frequently Asked Questions About Starlink Connection Drops
How do I fix starlink connection drops during heavy rain or snowstorms?
Heavy rain can temporarily degrade satellite radio links, while accumulated snow can obstruct the antenna’s view. Starlink includes snow-melt functionality on supported equipment, with Automatic mode designed to activate heating when needed. During heavy snowfall, accumulation may temporarily exceed the terminal’s ability to clear it. Check the app for weather-related alerts, inspect the dish only from a safe location, and allow conditions to improve before concluding that hardware has failed. Avoid scraping the antenna or using sharp tools. If interruptions continue in clear weather, investigate cable condition, obstruction history, and power stability instead of attributing every outage to weather.
Why does my Starlink app report “Disconnected” while the router light remains solid white?
A router’s indicator light and the app’s connectivity status do not necessarily represent the same connection. The light may indicate that the router is powered or operating normally, while the app is reporting a problem communicating with the terminal or accessing the internet. First, check whether other devices can browse and whether the phone is connected to the correct Wi-Fi network. Then inspect the app’s terminal status and alerts. If every device loses internet simultaneously, examine the terminal connection and power supply. If only the app reports a problem, update it and reconnect locally before assuming the dish is defective.
How long should Starlink stay in the “Searching” state before establishing a stable uplink?
There is no universal time limit because acquisition depends on hardware, location, startup conditions, software updates, and sky visibility. A newly installed or relocated terminal may take longer than an already operating system recovering from a brief interruption. Allow additional time during initial recovery, especially if software updates may be involved. If the status persists, check the obstruction view, power, cable connections, and service alerts. A persistent Searching state accompanied by a hardware warning deserves a support ticket rather than repeated rapid restarts.
Can an unshielded or slightly bent proprietary cable cause intermittent micro-drops?
Yes. Physical damage, an improperly seated connector, excessive bending, or repeated movement can compromise a cable’s electrical or data performance. However, an ordinary bend does not automatically mean the cable is defective; the manufacturer’s bend-radius guidance matters. Inspect the cable jacket and connector for damage, and check whether the issue began after moving the equipment. Do not attempt to straighten damaged internal conductors, splice proprietary cables, or apply unapproved grease. If the app reports a cable problem or the cable has visible damage, contact Starlink about the correct replacement for your hardware generation.
How can I safely reboot my Starlink dish remotely without climbing onto the roof?
If your Starlink model and app provide a restart control, use that feature while connected to the system. Otherwise, a household member can perform a normal power cycle at the accessible indoor power connection, following the equipment instructions. There is no need to climb onto the roof, open the power supply, or disconnect an elevated dish connector. If the system is installed at a remote property, a properly configured, manufacturer-compatible power-management solution may be considered by a qualified installer. Avoid repeatedly switching power on and off, since startup interruptions can complicate diagnosis.
Does prolonged exposure to extreme heat trigger thermal shutdowns on the dish?
High temperatures can affect electronic equipment, particularly when direct sunlight, poor ventilation, or an enclosed installation increases heat exposure. The applicable operating range depends on the specific Starlink model. If outages correlate with extreme heat, check the installation environment and ensure indoor equipment has appropriate ventilation. Do not place the router or power supply in an unventilated enclosure. Persistent temperature warnings should be documented and reported to support rather than addressed by opening the equipment.
Why does my Starlink drop connectivity every 10 to 15 minutes at consistent intervals?
A recurring interval is a useful diagnostic clue, but it does not identify one specific cause. Possible explanations include a repeating obstruction pattern, scheduled device activity, router roaming, power instability, or a software-related event. Record several outage timestamps and compare them with the Starlink outage history, connected-device behavior, and any scheduled backups or updates. Test with one device near the router while temporarily pausing large transfers. If the terminal itself reports interruptions at matching times, investigate the satellite link, obstruction map, and cable diagnostics. If only one device disconnects, focus on its Wi-Fi connection and network settings.
Does splitting my Wi-Fi into dedicated 2.4 GHz and 5 GHz networks prevent device disconnects?
Separating the bands can help diagnose problems involving band steering, roaming, or compatibility with older devices. The 2.4 GHz band generally offers greater reach through obstacles, while 5 GHz can provide more capacity at shorter distances. However, splitting SSIDs does not repair a satellite outage, defective cable, or unstable power supply. The setting is not available in every Starlink router generation or software release. Test a device on each available band while remaining near the router. If the problem occurs only on one band, investigate interference, coverage, and client compatibility before changing the dish installation.
What specific physical issue triggers the “No Signal Received” error in the app?
A no-signal indication can reflect a failure to receive the expected satellite communication, but it does not identify one guaranteed physical defect. Obstructions, terminal positioning, cable problems, power interruptions, and temporary network conditions can all affect connectivity. Begin by checking the app’s exact alert wording, obstruction visualization, service status, and accessible cable connections. If the terminal was recently moved, confirm that its placement and orientation follow the model’s installation guidance. A clear obstruction map does not prove that the cable or terminal is healthy, so persistent errors should be accompanied by diagnostic screenshots and a support request.
What is the fastest method to get a replacement cable or router approved by Starlink support?
The most useful approach is to submit a complete support ticket containing the hardware model, exact error message, interruption timestamps, relevant screenshots, and the troubleshooting already performed. Include photographs of visible cable damage if applicable, and explain whether the issue affects all devices or only one. If possible, document whether the fault persists after a safe power cycle and whether the app reports a cable or terminal warning. A replacement is not guaranteed simply because a ticket is submitted; support determines whether the evidence warrants a replacement component or additional testing.
Reliable internet connectivity
Reliable internet connectivity is essential for modern digital workflows, particularly for remote workers, smart home systems, and businesses running cloud-based applications. Frequent Starlink connection drops can interrupt automated processes, delay data synchronization, and affect communication between connected devices and cloud services. As organizations increasingly adopt intelligent systems, understanding the relationship between network infrastructure and automation becomes equally important. Our comprehensive guide on The Architecture of AI Automation explores how AI-driven workflows, enterprise automation models, system integrations, and autonomous technologies are shaping modern digital infrastructure.
Preventative Physical Maintenance and Long-Term Reliability
Preventing recurring connectivity problems begins with a sound installation rather than frequent software adjustments. Inspect accessible cable routes periodically, especially after severe weather, seasonal temperature changes, or work around the building. Look for abrasion, crushing, loose supports, and places where a cable rubs against a sharp edge. Outdoor cable exposed to sunlight should use the appropriate manufacturer-approved routing and protection, while wall penetrations should be sealed using suitable weatherproofing materials without obstructing drainage or damaging the cable jacket. Maintain a drip loop before exterior entry points and provide enough slack to prevent connector strain, but avoid loose cable sections that flap in strong wind. Mounting hardware should be secure and suitable for the installation surface. If a pole or roof mount vibrates noticeably, have its fasteners and structural support evaluated by a qualified installer. Do not climb onto a roof or work near overhead power lines to perform routine checks.
For households using Starlink as their primary internet connection, keep a simple maintenance record containing the terminal model, cable type, installation date, major app warnings, and dates of any equipment changes. This record makes it easier to recognize whether an outage began after a relocation, router replacement, or cable adjustment. Review the obstruction visualization after nearby trees grow or new structures appear, because a previously clear installation can become obstructed over time. Keep router firmware and the Starlink app current through their supported update processes, and avoid unnecessary factory resets or undocumented configuration changes. In RV installations, secure equipment for travel and verify that the terminal is positioned appropriately before relying on it at a new site. During severe weather, allow the equipment to recover before making multiple changes that obscure the original cause. If the same interruption returns after the physical installation, power, and local network have been checked, provide Starlink support with the recorded evidence. A methodical diagnosis is more useful than repeatedly replacing components without confirming the fault.
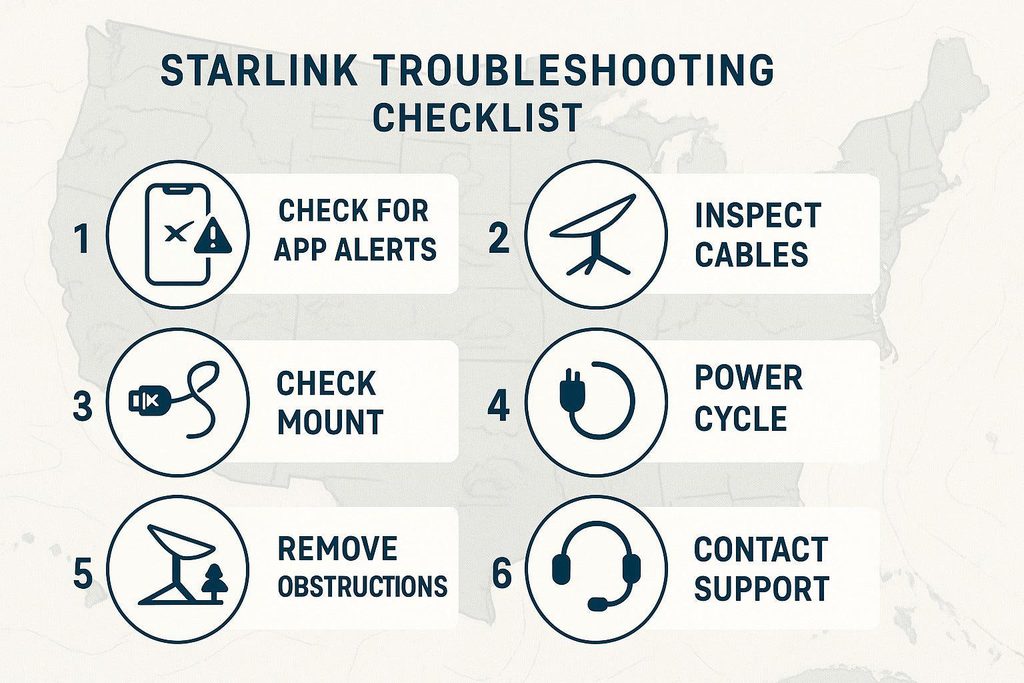
Final Troubleshooting Checklist
- Check Starlink service alerts and exact app status.
- Review obstruction visualization and outage history.
- Safely power-cycle the equipment once.
- Inspect accessible cables and connector seating with power disconnected.
- Test a device near the Starlink router.
- Temporarily isolate third-party mesh equipment.
- Record timestamps and diagnostic screenshots.
- Contact Starlink support if warnings or outages persist.


Pingback: Cloud Infrastructure Migration Guide: AWS, Azure & GCP